Hello friends….Are you ready for Spring? I sure am! I love the different seasons throughout our year but I am always ready for the next season when it comes around. I love the beauty of Spring when God brings us new things and everything is blooming and growing in nature! What is your favorite season?
My card today gets me so excited for Spring. It features the Sweet Strawberry Bundle. I have to admit, when I saw this bundle in the catalog it was not on my favorite list. In fact, I’m sorry to say, it sat on my shelf a few weeks before I picked it up. What was I thinking? Boy, was I wrong! It’s such a sweet bundle. I am really enjoying creating with it! I needed a thank you card and this set couldn’t be more perfect!
I used the retired Berry Delightful Designer Series paper which was in our recent Sale-A-Bration flyer. I decided I needed to use up some of my paper stash! If you don’t have this paper that’s okay, just substitute a different paper and email me a picture of what you create! I would love to see your creation!
I used Poppy Parade, Garden Green and Granny Apple Green ink to stamp the strawberries and stems. The strawberries, stems, flowers and sentiment are all popped up using stampin’ dimensionals. The background leaves and center of the flowers are colored using Granny Apple Green Stampin’ Blends.
To finish off the card, I kept the inside decoration simple with using a single sentiment stamped in Poppy Parade ink and a single punched strawberry and flower.
I have listed all the supplies and measurements below that I used to create this card. I would love it if you would subscribe to my blog, if you haven’t already done so! Thanks for stopping by my blog today. Wishing each of you many blessings of springtime!
Hello Friends!! It’s a beautiful sunny day in Kansas! I hope everyone is doing well. We have been doing a little gardening at our home today. So wonderful to get out and enjoy the sunshine!
I have a cute card I’m sharing today using the Snailed It Bundle from the January – June 2021 Mini Catalog. Isn’t the little snail so adorable? Friends, there is no stamping with this card. It features die cutting and faux embossing. The dies in this set match perfectly with the Snail Mail Designer Series Paper to cut the images. Easy peasy to create! There’s no inky fingers with this card!
I first adhered the snail, stamp and stitched pattern paper from the Snail Mail Designer Series Paper onto Bermuda Bay card stock using multi-purpose glue. Then, I die cut the images from the Snail Mail Designer Series Paper using the coordinating Snail Dies. How awesome is it that these two products coordinate together? I added adhesive sheets to scraps of Basic White, Real Red and So Saffron card stock before I die cut the mushrooms and ‘friend’ sentiment. This makes adhering these small detailed pieces together so easy and mess free!
The basic white stitched circle, cute little snail image and ‘hello’ sentiment are attached using Stampin’ Dimensionals.
For the friend sentiment, I used the faux embossing technique. I love this technique! Have you seen it? The first thing I did was adhere a scrap of Basic Black card stock to a scrap of an adhesive sheet. Then, I covered the Basic Black card stock with packing tape. You’ll want to make sure there are no bubbles in the packing tape. Then, press down the packing tape really well using a bone folder. Go over the packing tape several times with your bone folder. Once you have the packing tape firmly adhered, lay the ‘friend’ die down on top and run it through your die cutting machine. Peel the back off of the adhesive sheet and adhere to your card base.
I wrapped twine from the Snail Mail Twine Combo pack around the front panel and tied a bow before adhering the front panel to the card base with multi-purpose glue.
For the inside, I adhered a 5 3/8″ x 4 1/8″ piece of Bermuda Bay and 5 1/4″ x 4″ piece of Basic White card stock together using multi-purpose glue. Next, I adhered it to the card base. Lastly, I adhered a 3/4″ x 4″ piece of Snail Mail Designer Series Paper to the bottom of the Basic White card stock layer. I finished the inside by adding the large snail image which was die cut from the Snail Mail Designer Series Paper.
I’ve listed the supplies and measurements below to create this card. I’d be happy to answer any questions you may have! Please feel free to contact me! I appreciate you taking the time to stop by my blog today. I’m wishing everyone much happiness and sunshine this day!
The God of love and peace shall be with you.II Corinthians 13:11
Supplies:
Stamp set: Snailed It Bundle – # 156255
Cardstock: Basic Black – #121045, Basic White Thick – #159229, Basic White – #159276, Bermuda Bay – #131197, Real Red – #102482, So Saffron – #105118
Miscellaneous: Snail Mail Designer Series Paper – #154577, Stitched Rectangles – 151820, Stitched Shapes – 152323, Snail Mail Twine Combo Pack – #154579, Matte Black Dots, – #154284, Stampin’ Dimensionals – #104430, Multipurpose Liquid Glue – #110755, Adhesive Sheets – #152334, Packing Tape, Die Cutting Machine
Measurements:
Basic White Thick: 8 1/2″ x 5 1/2″ scored at 4 1/4″
Basic White: 5 1/4″ x 4, 2 3/4″ x 2 3/4″
Bermuda Bay: 2 1/4″ x 4 1/8″, 3″ x 4 1/8″, 2 1/2″ x 3 1/4″, 5 3/8″ x 4 1/8″, 1 1/2″ x 3 1/2″
Basic Black: scraps
Real Red: scraps
So Saffron: scraps
Snail Mail Designer Series Paper: 2 1/8″ x 4, 2 7/8″ x 4″, 3/4″ x 4″, 2 3/8″ x 3 1/8″
Have you ever wondered what the Customer Appreciation PDF is all about on the right side of my blog? This is a monthly PDF file sent via email as an appreciation for placing a qualified order. Each month a different designer is featured with new cards, projects ideas and tips! The designs and PDFs are created by my fellow Stampin’ Up teammates under the leadership of either Glenda Calkins (Team Stamp Camp) or France Martin (Frenchie’s Team). Each month brings different cards, projects, ideas and tips that allow you to create 4-7 cards or projects. In the PDF you receive a detailed list of instructions, supplies, measurements and photos to recreate each featured project.
I am honored, thrilled and humbled to have been asked to design/create this month’s PDF for Team Stamp Camp! I chose the Ride the Range Bundle as my featured stamp set. Being a Kansan, I couldn’t resist!
When I saw this bundle, I immediately thought about how much fun it would be to create with all the wonderful ink techniques that could be used for great landscapes and backgrounds! This bundle lends itself really well to using different techniques like watercoloring using ink or colored pencils, ink blending with blending brushes, sponges, brayering and coloring with Stampin’ Blends! In four of the 6 cards I created, I used some of these techniques and have shared tips and instructions in the PDF. The other two cards feature fun die cutting and even a fun fold that creates a memorable feature. Don’t let this set scare you away from creating a feminine card – the Ride the Range Bundle is sure to get you thinking and creating!
So, how do you receive a PDF file? By placing an online, minimum $30 order (before shipping and tax) using February Host Code : ATWRSXM7. Be sure to use the Host Code to qualify!
If placing an order of $150 or more (before shipping and tax), do NOT use the Host code. This purchase level automatically qualifies you to be your own Host, receive host benefits and the PDF.
Thanks for stopping by my blog! I hope my cards have inspired you to try a new technique or do a little stamping and sharing with others. If you haven’t already done so, I’d love it if you would subscribe to my blog. I would love to answer any questions you may have, so please feel free to contact me. Wishing you much joy!
Today’s card was created for my son’s friend, Brianna. The image is from the adorable Hey Girlfriend Stamp Set. Have you seen this set? It is in the new Stampin’ Up January-June 2021 Mini Catalog on page 50. I just love how these images can be used together or stand alone. The girls in the set are just a little bit sweet and sassy, perfect for a friend of any age. What a delight to color these images using Stampin’ Blends Bermuda Bay, Blackberry Bliss, Crumb Cake, Petal Pink, Pool Party and Basic Black. The Happy Birthday sentiment is heat embossed using White Stampin’ Emboss Powder. I cut out the letters for the word ‘Friend’ using the Playful Alphabet Dies. Die cut letters out of Foam Adhesive Sheets add dimension to the card.
I used the beautiful ‘Oh So Ombre Designer Series Paper’, which you can get for free right now during Sale-A-Bration with a $50.00 purchase (while supplies last)! For all the details on Sale-A-Bration be sure to watch the video below. Sale-A-Bration will last through February 28, 2021. It’s an awesome time to purchase those items on your wish list!
I layered the inside using Basic Black and Basic White card stock, with a touch of the Oh So Ombre Designer Series Paper. Then, stamped the puppy and balloon image using Memento Tuxedo Basic Black ink. The images are colored with Blackberry Bliss and Crumb Cake Stampin’ Blends. I couldn’t resist adding a bit of the matching ribbon to the inside of the card to finish it off!
Supplies:
Stamp set: Hey Girlfriend – #154516, Art Gallery – #154421
Cardstock: Basic Black – #121045, Basic White Thick – #159229, Basic White – 159276
Inks: Memento Tuxedo Basic Black – #132708, Versamark – #102283
Stampin’ Blends Combo: Bermuda Bay – #154878, Crumb Cake – #154882, Petal Pink – 154893, Blackberry Bliss – 154877, Pool Party – 154894, Basic Black – #154843
Miscellaneous: Oh So Ombre Designer Series Paper (Sale-A-Bration) – #155225, Stitched So Sweetly Dies – 151690, Playful Alphabet – #152706, White Stampin’ Emboss Powder – # 109132, Opal Rounds – 154289, Foam Adhesive Sheets – #152815, Stampin’ Dimensionals – #104430, Multipurpose Liquid Glue – #110755, Ribbon of Choice
Measurements:
Basic White Thick: 8 1/2″ x 5 1/2″ scored at 4 1/4″
Basic White: 5″ x 3 3/4″ cut 2, 4″ x 3 3/4″, 3 1/2″ x 2
Basic Black: 5 1/4″ x 4″ cut 2, scraps
Oh So Ombre Designer Series Paper: 3 3/4″ x 5″, 3 3/4″ x 1″, 3 3/4″ x 1″, 3 1/2″ x 1″, 3 1/2″ x 1″
Ribbon: 36 inches
Thank you for stopping by my blog today! I hope my card today has inspired you to do a little stamping and to share a little sunshine with someone special. And as always, I would love to help answer any questions you have – so please feel free to contact me! Have a blessed day!
Can you believe it – there’s only 13 more days before Christmas! Do you have your Christmas cards finished yet? If you’re looking for ideas to complete them, how about a slimline card? And if you haven’t created a slimline yet, I encourage you to give it a try! It was so much fun to create!
The stamp set featured in today’s card is the Gnome for the Holidays stamp set. These gnomes are just so ‘Holly, Jolly, and Everything’ and are sure to bring joy to your recipient! I used two squares from the Stitched Shapes Dies to create the frames and below you’ll find a photo of how I layered them together. Below is a list of the supplies I used to create this card.
I would be more than happy to answer any questions you may have about this card, so don’t hesitate to reach out to me. I hope everyone is taking time to enjoy the true meaning of this season. Thank you for stopping by my blog today and have a Merry Christmas!
Supplies:
Stamp Sets: Gnome for the Holidays – 153322
Ink: Memento Tuxedo Basic Black – 132708, Versamark – 102283
Card Stock: Whisper White 100730, Seaside Spray – 150883, Basic Black – 121045
Stampin’ Blends: Highland Heather Combo Pack – 154887, Pool Party Combo Pack – 144605 , Balmy Blue Combo Pack – 154830
Miscellaneous: So Many Snowflakes Dies – , Stitched Shapes Dies – , Snowflake Splendor Designer Series Paper – , Blue Adhesive Backed Gems – , Stampin’ White Emboss Powder – , Stampin’ Dimensionals 104430, Glue Dots 103683, Multipurpose liquid glue 110755, Snail Adhesive 104332, Simply Scored Scoring Tool 122334
Measurements:
Seaside Spray: Card Base 9 x 7 1/4” scored at 3 5/8
Whisper White: 8 3/4 x 3 3/8, 8 3/4 x 3 1/4 (cut 2), 5 1/2 x 2 1/2, 3 x 4 1/2
Basic Black: Scrap
Snowflake Splender Designer Series Paper: 8 5/8 x 3 1/4
Twine: 31 inches
Instructions:
Cut and score the Seaside Spray card base.
Stamp the gnomes in Memento Tuxedo Basic Black ink onto the 5 1/2 x 2 1/2 piece of whisper white card stock. Color using Stampin’ blends. Fussy cut around the three images.
Die cut three squares using one of the 8 3/4 x 3 1/4 whisper white card stock. Stamp ‘Holly’, ‘Jolly, and ‘Everything’ using Memento Tuxedo Basic Black ink onto the bottom of each square.
Die cut 2 snowflakes using 3 x 4 1/2 piece of whisper white card stock.
Stamp a ‘a little christmas wish’ using Versamark ink and then heat emboss using Stampin’ white emboss powder.
Adhere layers as follows onto front of Seaside Spray Card base: 8 3/4 x 3 3/8 whisper white, 8 5/8 x 3 1/4 Snowflake Splendor Designer Series Paper, and Whisper White die cut squares using Multi-purpose glue.
Attach snowflakes using Multi-purpose glue.
Adhere gnomes and ‘a little christmas wish’ using dimensionals.
Add Blue Adhesive Backed Gems.
Wrap twine around card base and tie with embellishment of your choice.
Inside: Onto 8 3/4 x 3 1/4 Whisper White card stock, stamp the gnome tree house and ‘There’s no place like Gnome’ sentiment using Memento Tuxedo Basic Black ink. Color the gnome tree house using Stampin’ blends.
Adhere to the inside of your card using adhesive of your choice.
Boy, do I have a fun card for you today! I designed this card for the November Twister Sister’s Team Swap. Our challenge this month was to create anything masculine. I chose to use the Senior Years stamp set to create my card. I used the following Stampin’ Blends to color the image: Petal Pink, Smoky Slate, Daffodil Delight, Basic Black, Pretty Peacock and Cajun Craze.
I’m always challenged when it comes to creating masculine cards. My brain is wired for anything frilly and girly but this masculine card was a blast to make! The Senior Years stamp set cracks me up! I just love this guy’s pants! Don’t you think the Plaid Tidings Designer Series paper was just the perfect addition to this card? This ole’ guy really makes me chuckle!
Below, I have included all the details to re-create this card. If you have any questions, I would love to help answer them!
Friends, I hope everyone is staying safe and healthy! I do hope you enjoyed my card and that I have inspired you to be a little crafty today! I would encourage you to bring a bit of joy to someone’s day by sending them a special card! Thanks for stopping by my blog! I appreciate you taking the time to look!
Supplies:
Stamp sets: Senior Years – 152630
Ink: Memento Tuxedo Black – 132708
Cardstock/Paper: Cajun Craze – 119684, Basic Black – 121045, Whisper White – 100730, Bumblebee – 153077, Plaid Tidings Designer Series Paper – 153527, In Good Taste Designer Series Paper – 152494
Cajun Craze: 8 ½ x 5 ½ score at 4 ¼ card base, 2 ¼ x 3, 1 ½ x 1 ½
Whisper White: 2 x 2 ¾ cut 2, 2 x 8 ½ for circles, 5 ¼ x 4Basic Black: 1 ½ x 5 ¼, ¼ x 4, ½ x 4
Bumblebee: ½ x 4
Plaid Tidings Designer Series Paper: 1 ½ x 5 ¼ , ½ x 4
In Good Taste Designer Series Paper: 5 ¼ x 4
Instructions:
Stamp the ‘Happy Birthday with Memento Basic Black ink onto stitched circle.
Stamp the man image with Memento Basic black ink onto a 2 x 2 ¾ whisper white cardstock. Color with Stampin’ Blends. Fussy cut the image.
Die cut 5 circles using 2 x 8 ½ Whisper White cardstock.
Cut a flag on one end of ½ x 4 Bumblebee and Basic Black cardstock.
Assemble layers as follows on Cajun Craze card base: In Good Taste 5¼ x 4, Basic black 1 ½ x 5 ¼, Plaid Tidings Designer Series Paper 1 ½ x 5 ¼, 5 Whisper White Circles, Cajun Craze 2 ¼ x 4, Whisper White 2 x 2 ¾.
Add the flag banners with stampin’ dimensionals.
Attach the man image with stampin’ dimensionals.
Add ‘Happy Birthday’ sentiment using stampin’ dimensionals
Color Rhinestone Basic Jewels with the Dark Black Stampin’ Blends.
Embellish Flag banners with colored Rhinestone Basic Jewels.
Inside: Stamp the man image using Memento Tuxedo Basic Black ink.
Inside Layers: Adhere ½ x 4 Plaid Tidings Designer Series Paper and ¼ x 4 Basic Black card stock onto 5 ¼ x 4 Whisper White cardstock.
I hope you are doing well and enjoying your Fall! Wow has it been busy so far! I’ve been working many projects behind the scenes, which has made me conspicuously absent from the blog. Very sorry about not posting recently, but I am happy to be back and sharing a terrific project with you today!
One of the many projects I was working on was my Stampin’ Up Team Swap Card. I am honored to be a part of the Twister Sisters team – a very fun group of downline demonstrators that meet regularly to share creative projects and have fun! For our October card swap, we were asked to create a ‘clean and simple’ card. I used the Beautiful Autumn stamp set and the ‘thumping’ technique to make this special card that absolutely speaks to me of Autumn. I’ve included all the details for creating this card below, and as always, if you have any questions about how this was made, please get in contact with me!
Cardstock/Paper: Gilded Autumn Designer Series Specialty Paper – 153520, Whisper White Thick – 140272, Whisper White – 100730, Early Espresso –119686, Granny Apple Green – 146990
Whisper White Thick: 8 ½ x 5 ½ score at 4 ¼ card base
Whisper White: 5 1/8 x 3 7/8, scraps
Gilded Autumn Designer Series Paper 5 1/8 x 3 7/8
Early Espresso 5 1/8 x 3 7/8, ¼ x 3 ½
Granny Apple Green 5 1/8 x 3 7/8,
Instructions:
Stamp the ‘Have a Beautiful Day’ with VersaMark ink onto the ¼ x 3 ½ Early Espresso card stock. Heat emboss with White Stampin’ Emboss Powder.
Stamp leaves and acorn using Early Espresso ink onto scraps of whisper white card stock. Stamp acorn top using soft suede ink. Stamp the main portion of acorn using crumb cake (stamp off once). Stamp the leaves in Daffodil Delight. Apply Thumping Technique to leaves using Stampin’ Write markers.
Dry emboss 5 1/8 x 3 7/8 Whisper White card stock using the Tasteful Textile 3D Embossing Folder. Sponge lightly with Soft Suede ink.
Diagonal Cut: Make a pencil tick mark 1 inch from upper left corner going right, a tick mark from the upper right and corner going down at 2 ¾ inch, a tick mark from the bottom left corner going up 3 ¼, and a tick mark from the bottom left corner going right at 3 ¼ inch. Line up your tick marks and cut at a diagonal. Keep triangles and throw away center.
Adhere white embossed triangles onto Early Espresso 5 1/8 x 3 7/8 card stock. Cut early espresso layer 1/8 inch from white embossed triangles. Repeat process with 5 1/8 x 3 7/8 Granny Apple Green card stock.
Assemble layers as follows on card base: Early Espresso 5¼ x 4, Gilded Autumn Designer Series Specialty Paper 5 1/8 x 3 7/8; using stampin’ dimensionals adhere triangle layers.
Add leaves using mini glue dots. Attach acorns using dimensionals.
Add sentiment and gilded gems.
Thank you for stopping by my blog today! I hope I inspired you to do a little crafting today and share with someone special! Hugs!
Today, I’m excited to share some awesome cards designed by The Twister Sister’s Team! Our theme for the month of October was to create Clean and Simple cards. These ladies knocked the ball right out of the park with their awesome designs and talent! I love being part of this team, they are a wonderful group of ladies who know how to have fun!!! If you are interested in joining our team, please click here. We would love for you to join us!!
Created By Tina Gardner
I appreciate you stopping by my blog today! I hope you have enjoyed seeing these beautiful cards! If you have any questions, I would love to help answer them, please don’t hesitate to reach out to me! Have a blessed day, friends!
In celebration of my momma’s birthday, I’m remembering the gift of my mother and how important she is to me.
“Mom, I would like to say a special thank you from the bottom of my heart for your compassion, unconditional love, patience, selfless sacrifices and surrender that you have given me and still give to me today!”
As an adult with children, I appreciate her more today for her dedication, courage and selflessness in raising me. She was a stay-at-home mom most of the time I was growing up and sacrificed much of her time and desires for her children.
“Thank you, momma, for your love, examples, encouragement and sacrifices. Love you with all my heart! Happy Birthday!”
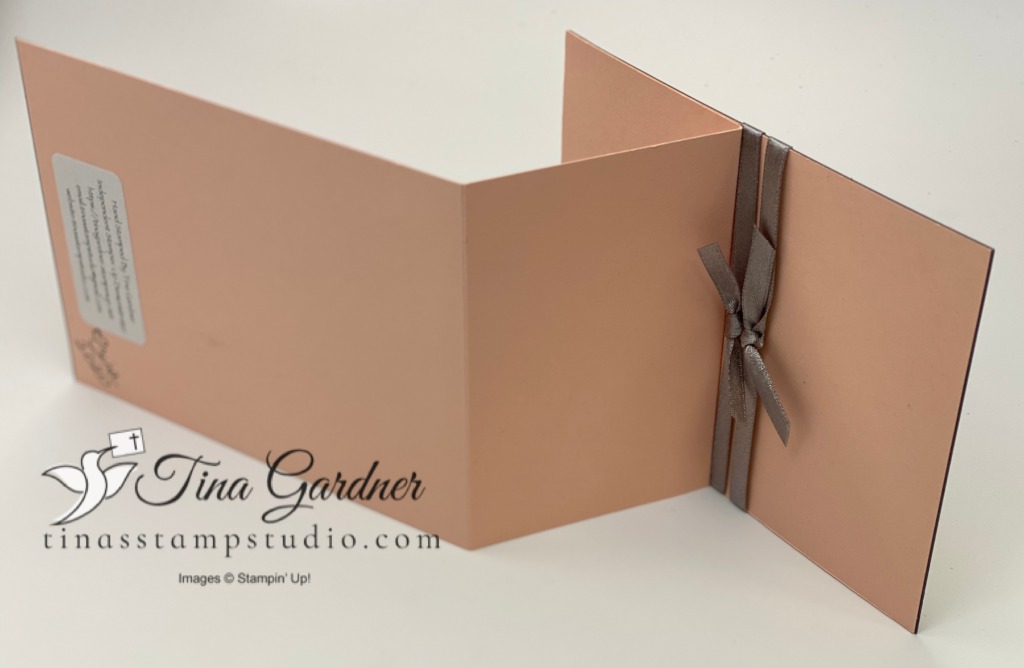
Today’s card is a card I designed for her. It’s a Double easel card using the Prized Peony and Ornate Thanks stamp sets. This card may appear to be complicated but it really isn’t. Actually, its a fun and simple card to make! Below are the details on this card.
Miscellaneous: Orante Layers Dies – 152726, Tasteful Labels Dies – 152886, Peony Dies – 152701, Rhinestone Basic Jewels – 144220, Gray Granite Shimmer Ribbon – 152463, Tear n Tape – 138995, Dimensionals – 104430, Multipurpose glue – 110755, Whisper White medium envelope – 107301, Paper Trimmer – 152392, StampinCut & Emboss – 149653
Measurements:
Easel 1
Petal Pink: 11 x 4 1/4 (Score and Fold at 5 1 /2 and 2 3/4) (card base); 5 1/2 x 4 1/4
Basic Gray: 5 1/2 x 4 1/4 (cut 2)
Whisper White: 5 x 3 1/2, 4 x 3 1/2
Peony Garden Designer Series Paper: 5 1/4 x 4 (petal pink rose pattern); 5 1/4 x 4 (Gray rose pattern-inside); 3 3/4 x 2 3/4 (petal pink pattern for framelit)
Ribbon: 32 inches
Easel 2
Petal Pink: 5 1/2 x 2 1/8 ( Score and Fold at 2 3/4 and 1 3/8); 2 3/4 x 2 1/8; 2 x 2
Basic Gray: 3 x 2 3/8; 2 5/8 x 2 (cut 2)
Whisper White: 2 x 2 (center focal frame); 2 1/4 x 1/2 (sentiment); 2 x 1 1/2 (small peony)
Peony Garden Designer Series Paper: 2 1/2 x 1 7/8 (Petal Pink Pattern); 2 1/2 x 1 7/8 (rose bud pattern)
Instructions:
Easel 1
Adhere the 5 1/2 x 4 1/4 petal pink card stock to the Petal Pink 11 x 4 1/4 base at the 2 3/4 scored and folded line using Tear n Tape.
Adhere the 5 1/2 x 4 1/4 Basic gray card stock to the 5 1/2 x 4 1/4 petal pink card stock.
Die Cut whisper white frame using Ornate layers die.
Stamp the large Peony flower with Memento Basic Black ink onto 5 x 3 1/2 piece of whisper white card stock. Color with Petal Pink and Soft Sea Foam Stampin’ Blends.
Die cut Peony flower using Peony using Peony dies.
Die cut Pattern Petal Pink framelit using Tasteful labels dies.
Layers: Adhere 5 1/4 x 4 petal pink rose pattern to basic gray card stock.
Wrap Gray Granite ribbon and tie at back two times.
Attach die cut whisper white ornate frame using dimensionals; Adhere the pattern Petal pink framelit using multipurpose glue.
Attach Stamp and colored die cut peony using dimensionals.
Add Rhinestone Basic Jewels.
Inside Layers: Adhere 5 1/2 x 4 1/2 Basic Gray card stock to petal pink card base; Adhere 5 1/4 x 4 Gray rose pattern-inside) using multipurpose glue.
Easel 2
Color 2 1/2 x 1 7/8 rose bud with Petal Pink and Soft Sea Foam Stampin’ Blends.
Stamp the small peony using Memento Tuxedo Basic Black ink on 2 x 1 1/2 piece of whisper white card stock. Die cut using Peony dies.
Stamp the “your amazing” sentiment with Memento Tuxedo basic black ink onto 2 1/4 x 1/2 whisper white card stock.
Die cut center focal frame using Peony Garden petal pink pattern designer series paper 2 x 2 and whisper white 2 x 2 card stock.
Adhere the 2 3/4 x 2 1/8 petal pink card stock to the scored and folded 5 1/2 x 2 1/8 piece of petal pink card stock at the 1 3/8 scored and folded line using Tear n Tape.
Layers: Adhere the 2 5/8 x 2 basic gray card stock to the 2 3/4 x 2 1/8 petal pink card stock, then, 2 1/2 x 1 7/8 rose bud patten).
Next, adhere the whisper white focal die cut and petal pink pattern designers series paper focal die cut using multipurpose glue.
Attach the sentiment using dimensionals to the center.
Add Rhinestone Basic Jewels. You should now have the front of Easel 2 completed.
Next, attach the 5 1/2 x 2 1/8 petal pink card stock to the 3 x 2 3/8 Basic Gray card stock using multipurpose glue.
Inside layer as follows: Adhere the 2 5/8 x 2 basic gray card stock to the inside of petal pink easel base. Then, adhere the 2 1/2 x 1 7/8 Peony Garden Designer Series Paper petal pink pattern.
Attach the small die cut and colored peony using stampin’ dimensionals. (This will ensure that easel 2 stands up).
Adhere complete Easel 2 using stampin’ dimensionals to bottom center of card base. The stampin’ dimensionals will ensure that easel 1 stands up.
Decorate envelope to match.
Enjoy!
Here’s a side view of the easels.
Here’s the the side view of the backside.
Thank you so much for visiting my blog today. I hope you have enjoyed this Double Easel Card! I tried to be clear and detailed on the instructions but if you have any questions, please reach out to me. I’d be happy to help however I can. Have a blessed day!
When do you start your holiday craft planning? Seems like the holidays always sneak up on me. This year, I hope to be a little more ready when the holidays roll around with my crafty gift giving and Christmas cards. So, I’m starting early! I hope my card today inspires you to start your holiday crafting!
Have you had a chance to browse the 2020 Mini Catalog? There’s so much crafty goodness in there that I’d love to get my hands on! The Sweetest Time Bundle jumped right out at me, so my card today will feature this versatile group. You could use this bundle for creating everything from whimsy to elegant designs. My design today used a neat technique – I used gold embossing powder to heat emboss the candles and berries. Below are the measurements and details on this card – I hope it inspires you!
Supplies:
Stamp Sets: Sweetest Time – 153436
Inks: Night of Navy – 147110, Versamark – 102283
Cardstock/Paper: Whisper White Thick – 140272, Whisper White – 100730, Night of Navy – 100867
Whisper White Thick – 8 1/2 x 5 1/2, Scored at 4 1/4
Whisper White – 5 1/8 x 3 7/8, 4 3/4 x 3 1/4, 3 3/8 x 2 5/8, 3 x 2 1/2, 2 5/8 x 1/2, Scraps
Night of Navy – 5 3/8 x 4 1/8, 5 1/4 x 4, 2 3/4 x 5/8
Gold Foil Sheets- Scraps
Silver Foil Sheets- 3 1/2 x 2 3/4, Scraps
Forever Greenery Gold Trim: 47 inches
Instructions:
Card Base: Score and fold at 4 1/4.
Stamp the candles with versa mark ink onto a 3 x 2 1/2 inch piece of whisper white card stock . Heat emboss using Gold Stampin’ Emboss Powder. Stamp the leaves onto a 5 1/8 x 3 7/8 whisper white card stock with versa mark ink and heat emboss using Gold Stampin’ Emboss Powder. Stamp berries onto scraps of whisper white card stock using versa mark ink and heat emboss using Gold Stampin’ Emboss Powder.
Stamp ‘Bright & Peaceful’ sentiment using Night of Navy ink onto the 2 5/8 x 1/2 whisper white card stock.
Stamp ‘all is calm’ sentiment and berries using Night of Navy ink onto the 5 1/8 x 3 7/8 whisper white card stock.
Fussy cut candles. Temporarily position the embossed candles onto the 3 3/8 x 2 5/8 inch piece of whisper white card stock.
Stamp the candle flames in versa mark ink onto the 3 3/8 x 2 5/8 inch piece of whisper white card stock. Heat emboss using Gold Stampin’ Emboss Powder.
Die cut 3 each of large and small leaves using scraps of Gold and Silver foil sheets.
Die cut gold embossed berries.
Wrap Forever Greenery Gold Trim around Night of Navy 5 3/8 x 4 1/8 card stock layer.
Adhere layers as follows onto card base: Night of Navy – 5 3/8 x 4 1/8; Whisper White 4 3/4 x 3 1/4 and Forever Gold Laser-Cut Specialty Paper Panel; Silver Foil Sheet 3 1/2 x 2 3/4 and 3 3/8 x 2 5/8 flame embossed whisper white card stock.
Adhere embossed candles to flame embossed layer using stampin’ dimensional.
Arrange the foil die cut leaves and berries. Adhere to candles using glue dots.
Color the basic Pearl Jewels using the Dark Night of Navy Stampin’ Blends. Arrange on leaves as desired.
Adhere the 2 3/4 x 5/8 piece of Night of Navy card stock and ‘Bright & Peaceful’ sentiment using multipurpose glue. Adhere to project using stampin’ dimensionals.
Tie a small bow using Forever Greenery Gold Trim and attach using a glue dot.
Inside: Adhere the 5 1/4 x 4 Night of Navy and stamped 5 1/8 x 3 7/8 whisper white layer using multipurpose glue.
Stamp and emboss the envelope.
Friends, I hope I have inspired you today! Thank you for stopping by my blog. If you have any questions on this project or I can help you with anything, please don’t hesitate to reach out to me. Have a blessed day!
Welcome to Tina’s Retired Product Sale! I hope you are ready for some shopping because there is plenty to choose from! Before you get started let me tell you some details of the sale!
You can find all of the retired products listed under “Retired Products” on the menu bar at the top of my blog. Just click on Retired Products from the menu bar and you will see a catalog of the sale items.
Some of these products have never been used. Some are gently used. Some may have slight ink stain. You can find all the details in the description portion of the listing.
Shipping is USA ONLY and is a Priority Flat Rate that includes shipment tracking and $50.00 insurance. For those of you who are local, I do have a free local pick-up option at check out.
All sales are Final. No refunds or exchanges.
You will find a variety of stamps, stamp and die sets and stamp and punch sets. If a stamp is offered with a punch or die, they are sold as a set. I won’t be able to sell them separately.
Retired products DO NOT qualify for the Hostess Code Customer Appreciation pdf.
Check Out:
IMPORTANT: When you pay your invoice make sure your shipping address is correct. The shipping labels are generated from the invoice.
If you are local and want to pick up your product, you must choose local pick up for free shipping.
Thanks for stopping by my blog today! I appreciate you taking the time to look! I hope you have a blessed day!
Hello Friends! Yay!! I have some exciting news to share today!
AUGUST – DECEMBER 2020 MINI CATALOG GOES LIVE!!
The new August – December 2020 Mini Catalog goes live today! TODAY is the day we can begin ordering from the new 2020 mini catalog!!
Have you started planning your holiday projects? Well, now’s the time to start your planning. Why not invite a friend over to create, talk and connect! Together you can create memories and then share your handmade creations with others!
Friends, you are going to want to take some time to browse through this catalog! It is packed with wonderful Autumn, Fall and Winter products and ideas! You and your friend will have plenty of projects/ideas to choose from. You can click on the photo above or on the right hand side of this blog to browse through this catalog. Have fun and start creating your projects today!
And now for some more exciting news!!!
STAMPIN’ UP HAS A NEW ONLINE STORE!!
Starting today, Stampin’ Up is bringing us a new and improved online shopping experience!
Below are just a few of the great features of the new online store:
The store is designed to work seamlessly on desktops, tablets, and mobile phones!
The sight utilizes new, larger imagery to allow up-close details to be seen. I love, love this feature!!
The new sorting options and filters provide for a more intuitive shopping experience!
We can favorite items for future reference and create and share our own personalized wish list! (Another feature I absolutely love!)
Be sure and visit my online store (CLICK HERE) to see all of the great new features Stampin’ Up has to bring to our shopping experience! Or, click on any of my SHOP NOW button on this blog!
IMPORTANT! Just a couple of things to note about the new online store.
Your saved login and passwords will not automatically apply due to a new URL. If you don’t remember your password, you can reset it by clicking on the forgot password link. If you don’t receive an email in your inbox shortly after resetting, please check your junk folder.
You will have an option to choose your demonstrator once you login. I would be so thrilled if you chose me to be your demonstrator!
I hope you all enjoy browsing Stampin’ Up’s new online store! If you have any questions or if there’s anything I can help with please let me know! Enjoy your day, friends! Thanks so much for stopping by and don’t forget to create something new and share with others today!
The content in this blog is the sole responsibility of Tina Gardner as a Stampin' Up!® Independent Demonstrator. The use of and content of classes, services or products offered is not endorsed by Stampin' Up!